Sunday, December 4, 2011

Tornador Air Foamer HP

Its been almost a year since my last up date.  So what's new this time round?  Well its the Tornador Air Foamer HP.  Its basically a tool which foams up your car shampoo and creates a rich foam to wash your car with.  You can virtually use any car shampoo you wish.  In this test I used a regular "Over The Counter" (OTC) car shampoo called Kit Car Shampoo made by SC Johnson so you can see how this tool foams up with regular car shampoo.

The foamer is easy to use just fill up your shampoo mix add air pull the trigger and start foaming.  For the foamer to work you obviously would need an air compressor which you can easily purchase from your local hardware shop which retails tools and equipment.  You will need 60-90 psi of air pressure.  I have a 3hp air compressor with a 35 litre tank.  This will just be enough for the foamer.  It wont have enough air capacity for you to foam the whole car at one go but it will allow you to foam the car in sections at a time.  Here in Malaysia where the temperature is around the 30 degrees Celsius, I don't recommend foaming the whole car.  Because of the fact that by the time you get to the rear section of the car some of the foam would have dried out.  The best I have found was to foam and wash the car sections at a time.  This would also help my small compressor to fill up in between foaming sections as well.

The shampoo concentration that I used was 1:40.  Which works out to be 25ml:1000ml.  The container which holds the mix is a 1000ml container.  I have found that this would just be enough for a mid sized car like a Toyota Camry excluding the wheels.  In order to do the whole car you would need about 1.5liters.

Remember that this is a 1:40 mix of concentrated foam that you are spraying on the car, so its much stronger that your regular bucket wash mix. You don't really need to foam the whole car until the whole panel is hidden away by foam.  As usual you should always hose or wash the car down. Hose the car down with water first to remover excess dirt and dust to reduce marring of the paint.  This also would help to further dilute the foam wash mix as the foam will be slightly diluted by the water on the car.  It also help with further lubrication as the foam itself is quite "dry".  I found that 1:40 would be about the minimum mix for the foamer to foam properly.  But obviously this would vary with different products from different brands.

Ok, so lets start foaming.  Here are some pics of the car being foamed.


 The foam that you see in the last picture of the bonnet is more than enough.  You don't need to completely cover the car with foam as the foam is concentrated and you will very shortly see that any more will be wasted.

This next set of pictures are of the foam being spread evenly by the wash sponge.  By doing so helps to spread out the foam more evenly and gets it ready for the actual wash.  All you need to do to spread the foam is just to glide the wash sponge over the foam, about 1cm away from the surface of the car.  This will allow you to spread the foam with the sponge with out actually having the sponge touch the car.  This will reduce the chance of you causing any marring on the paint.  If the car wasn't very dirty to being with you could actually rinse the car.  But if the car was originally quite dirty, after spreading the foam you would continue to wash the car as you would normally.  But I would actually tilt up the sponge at the front leading edge up slightly so that the foam will be pushed under the sponge which helps cleaning.  If not you may be pushing the foam off the car. I find that with this method you need very little pressure to clean the car as the foam also helps to lift the dirt off the car helping to reduce the chance of marring in the wash process.

Sponge actually floating on the foam


Lift whole sponge 1cm to spread the foam.  Then ONLY lift the leading
edge to wash the car and to push the foam under the sponge.

Sponge covered by a layer of foam to reduce marring on the paint

By now continue washing as usual then rinse to wash away the dirt and foam.  Then move on to the next section of the car.  Remember to have a clean bucket of water to wash your sponge whenever it gets dirty or between sections of the car.  Here are more pictures of the car being washed and foamed.

Roof Foamed

Roof Foamed

Roof Foam Spread

Roof Foam Spread

Roof Foam Spread

Roof Foam Spread
Side Foam Sprayed

Side Foam Spread


Side Foam Spread

Tyre Foamed
Tyre Washed Ready For Rinse.
The foam looks clean because the wheels are quite
clean as the original brake pads are extremely low dusting.

So here we come to the end of the is review.  All in all, I think this Tornador Air Foamer HP works really well.  Its a very nice experience washing the car with such rich foam.  To put it in words, while washing the car it feels like it cleans very well but very gently.  Partly due to the fact that you are using 1:40 concentration shampoo mix and that you have the foam to help lift off dirt and contaminants which also reduces the chance of marring and very little pressure and effort is needed to wash a car which is relatively clean to being with.

Personally I think this is a great tool to have even for a novice DIY detailer to a serious detailer.  Mainly because it can greatly help to reduce marring on the car and its easy to set up and use.  Not to mention the kids love the foam and will find great pleasure in washing the car.  That is if you let the kids.

For those living in Malaysia, the Tornador Air Foamer HP is available at Duragloss Malaysia.  At the time of writing its not posted up as yet at the Duragloss Malaysia website, but just call them to place an order to purchase.  Call Duragloss for Malaysian pricing.

Friday, February 25, 2011

DURAGLOSS PRODUCTS SET TO GO ON TRIAL PART 5 UPDATE

Here's another update on Duragloss's Products.  This time I'll be reviewing Duragloss Track Claw Racing Polish 2930 which has Fluropolymers in it.  Duragloss claims that it reduces dust pick up and lowers coefficient of drag.

DURAGLOSS TRACK CLAW RACING POLISH 2930


After driving the maroon Civic with the Duragloss Aquawax 951 and Duragloss 105 TPP layering combo I wash the car and decided to try out the Duragloss Track Claw Racing Polish 2930.  After washing and drying I applied Track Claw to the whole car and allow the car to haze for about 1hour.  Application was easy like Duragloss's other products.  Spreads easily and well.

After letting it dry and haze for about an hour if buffed the car.  This is where I was surprised by Duragloss's Track Claw Racing Polish.  It was so easy to buff the haze away.  Really no buffing, it jwas just a wipe across the surface with very little pressure and the haze wash removed and the shine revealed.  Most other products you would require a little pressure buff and remove the haze but not the Track Claw Racing Polish.

After removing the haze I took a clean mircofiber and started to buff the paint and to make sure I didn't miss any parts.  The shine was just amazing.  It actually changed the look of the car slightly.  With the layering of Aquawax 951 and TPP 105 it made the car look deep, wet, slightly warm and shiny.  But with Duragloss Track Claw Racing Polish 2930, it was still deep, wet and shiny but slightly less as it has changed to slightly harder look and more reflective and mirror like.  Personally I really like this look.

Many synthetic sealants can make a car look hard and shiny which lacks depth and clarity of reflection.  But what I have on the car now is just the right balance of depth, shine and clarity of reflection.  Honestly I don't know the effect I got can be had with Duragloss Track Claw Racing Polish if applied alone.  My effect could be caused by the the layering of Aquawax and TPP 105 with Track Claw on top.  In any case you might want to experiment on the combination.

The feel of the Duragloss Track Claw Racing Polish 2930 is very smooth and slick much more than the other Duragloss products.  The cloth just glides over the paint effortlessly at the same time removing the haze.

The only problem which I had with Duragloss Track Claw Racing Polish 2930 was with water marks.  This is not the fault of the product but the fault of the user.  What I mean is, while I was applying Duragloss Track Claw Racing Polish 2930 the car wasn't 100% dry.  There was small amounts of water here and there in the nooks and crevices.  So this water was mixed and spread with Duragloss Track Claw Racing Polish 2930 and was left to dry and haze.  So when I wiped the haze away there were water marks and I tried to buff it away but couldn't even with slight pressure with a clean microfiber.  So what I did was to use some Duragloss Track Claw Racing Polish 2930 on the water spots and it came off.

Moral of the story is, make sure your car is fully dry before applying Duragloss Track Claw Racing Polish 2930. Here is a picture of what I talking about.


 In conclusion Duragloss Track Claw Racing Polish 2930, the best way to describe it is that its a very good product which really gives a clear, crisp and reflective shine which is easy to apply and extremely easy to remove.  Just a great product all in all.  Here are some pictures for comparison.

Duragloss AW 951 + TPP 105

Duragloss Track Claw Racing Polish 2930
From the photos you can clearly see that the Duragloss Track Claw Racing Polish 2930 has more of a mirror shine as can be seen by the detail of the pillar reflection on the bonnet.  You can see the textured surface of the pillar reflected off the paint.  The picture resolution on the Track Claw is only 563KB and the the other picture is about 1MB.

More picture of Duragloss Track Claw Racing Polish 2930 below.


Another Great product from Duragloss.

Tuesday, February 1, 2011

DURAGLOSS PRODUCTS SET TO GO ON TRIAL PART 4 UPDATE

I'm back with new updates.  Here I'll talk about my experience with Duragloss 101 Polish & Cleaner, Duragloss Aquawax 951,  and a great way I found to get a real deep wet look which I found on the web.

DURAGLOSS 101 POLISH & CLEANER

I was looking to get an All In One polish/sealant.  I was recommended to try Duragloss 101 Polish & Cleaner.  So I bought a bottle to try.  When I found time, I washed the car, clayed it then polished it with Duragloss 101 Polish & Cleaner.  

What I like about the product is its ease of use.  I used it with a rotary buffer/polisher with a black finishing pad.  What did I mean about ease of use?  Its "clean" meaning it hardly has and powdery residue, it doesn't stain black trimming or rubber if you get some on it.  Only thing to be aware of when using Duragloss 101 with a rotary is that it dries quite fast.  So I just had a bottle of filtered water in a sprayer handy.  I would spray the pad with a little water then apply Duragloss 101 to the pad then spray a little water on the car then start polishing.  Speed I used was 500rpm to 1000rpm.  The shine was good but not deep and wet but its a white car anyway.  Feeling was smooth and slick.

Cleaning ability of this polish I would say would be  medium-low for white cars.  As a comparison  Klasse All In One has better cleaning power then Duragloss 101 on white cars.  So I would say to only use Duragloss 101 if the car is only slightly/lightly stained.

DURAGLOSS 951 AQUAWAX

I tried the Duragloss Aquawax as well.  I find that its really smooth and slick and extremely easy to use.  Great product which can be used on a wet or dry clean car.  I prefer to use it on a dry car.  Application was very easy, just spray and wipe on a section until it dries and disappears.  Once you have done the whole car,  you may find some streaking.  I just used a clean mircofiber cloth to buff and the streaks were gone.  So after doing the whole car with Duragloss Aquawax, I just let it sit and cure for a while and went through buffing the whole car with a clean microfiber cloth to bring out the great Duragloss shine and feel.  

Duragloss Aquawax is a great product for in between applications of wax/sealants.  Its easy to use, shine is great, doesn't stain trim and the feeling is really smooth and slick.  No surprise why many people in many forums across the world speak highly of this great product.  

Water beading and sheeting (when the beads clumps together) is also really good with Duragloss Aquawax.  So if your sealant is loosing its beading ability, just put some on and your car will bead again very well.  How well it beads and sheet will also depend on the surface condition.

A word of advice,  this product seems to work great and looks great on a solid paint with no clear coat.  But I found that Duragloss Aquawax stained easily on my white car which is a solid colour with no clear coat.  After having black streaks on the Duragloss Aquawax I found that by just using water alone did not clean off the black streaks as well and what I have experienced with just Duragloss 105 Total Performance Polish.  But the stains was only removed with a full car wash.  

I tried it on another car with clear coat on it and it doesn't have that problem,  so my case might be an isolated case but its just good to be aware that this happened to me.  

DEEP & WET LOOK SHINE

I was surfing around the web/forums and I found this post by Rabbi: 

"This was posted awhile back by a fellow member.
apply the 601 by hand..it is a white creamy lotion....leave it on..do not wipe off..wait about 20 minutes apply either the 105 or 111 sealant(polish)..the 105 looks better...

Now if you want a liitle system that works real nice...follow this..


polish if need to..clay also before polishing

wash car....

Use Fast Clean and Shine after drying...leaves the car slick and helps spreading the PBA thin

apply PBA ..bonding agent...let sit for 10-20 minutes to haze...but leave it on ..do not buff off

if you have Aquawax..apply a quick lite spritz to your applicator you are going to use to put the sealant on with...I use a Meg's foam applicator...or the polish pal..

put the sealant on ..let haze...30 minutes ..wipe off....


NOW...if you are going to more layers...3 is nice...before doing a 2nd layer wipe down car with AW after a wash ...then apply your sealant...do this before each layer after the initial first one...

Also spritz the pad with AW again like first time..

Sorta like doing Zaino ...AW adds a gloss enhancer before sealant..plus helps spread it nice and thin....

wait at least 24 hours between coats....I did 3 in 2 weeks spread...

but doing Aw before applying sealant and spritzing pad makes a world of difference....

I give credit to this method to a buddy of mine who did it like this...his truck is AWESOME looking...a mile thick ..wet as rain...

any questions just ask....Glad to help

you will like what you see.."

So I decided to try out this method of layering Duragloss Aquawax 951 and Duragloss 105 Total Performance Polish.  I tried it on both my cars.  First was the Honda then the Nissan.

The Honda was just clayed, polished, Duragloss 601 Paint Bonding Agent and sealed with Duragloss 105 Total Performance Polish just recently.  So I just washed the car then dry and went over with Duragloss Aquawax.  Let cure for about 15mins then buff once more to make sure no streaks and missed parts.  Then I applied Duragloss 105 Total Performance Polish.

I was amazed with the results.  It gave a much deeper color to the paint and a really wet look with great reflections and shine.  I really love it.  With just the regular Duragloss 601 PBA and Duragloss 105 TPP the shine looks "harder" not as deep and wet.   Here are some pictures.

Duragloss Aquawax & Duragloss 105 TPP


Duragloss Aquawax & Duragloss 105 TPP


Duragloss 601 PBA & Duragloss 105 TPP
Then I was excited to try this combination on my Nissan. Here I applied the Duragloss Aquawax with a rotary buffer/polisher with a black finishing pad.  All I did was to spray it on the pad and alittle on the car as well and work it into the paint until it disappears.  Then I left it for 15 mins then buff again to remove streaks.  Then I applied the Duragloss 105 Total Performance Polish.  Please note that the car is 14 years old with its original paint.

Duragloss Aquawax & Duragloss 105 TPP


Duragloss 601 PBA & 2nd Coat of Duragloss 105 TPP
I think I will try using the rotary buffer/polisher with the Duragloss Aquawax next time on the Honda then layer the Duragloss 105 Total Performance polish by hand.  Why?  Because on the white Nissan the camera was is not able to catch the layer which is put down by the Duragloss Aquawax with the rotary buffer/polisher which I tried to capture but could not.  The rotary seems to be able to put a thicker layer than normal hand would be able to.  Kind of hard to describe but you can definitely see it but not able to capture in the photo.


I would recommend to try this method of layering out.  More work but well worth the effort.  A month or so that I have been trying out Duragloss products, I have been pleasantly delighted by the performance, look, ease of use, very little dusting/powder and non trim staining products.  I would highly recommend anybody to try Duragloss's range products as it has great "bang for the buck".


Next I will try to do another 1 to 2 layers and see how it goes.  Then I will move on to Duragloss Track Claw 2930 Polish.

Tuesday, January 25, 2011

TRW BRAKE ROTOR AND BENDIX GENERAL CT PAD CHANGE: UPDATE

So far I have done about 5000km and the pads has fully bedded in.  How is it so far?  So far so good.  No more brake judder or vibration coming from the brakes.

Performance of the Bendix General CT for me has been good. Brake dust has been low and was easy to clean.  Braking performance has been good.  But I did notice that the pads just needs a little temperature to really to be at 100%.  Long highway drives tend to cool the pad down a bit and upon application the pad is still good but not as good as when it has a little more heat in them.  

Personally I think this pad is a very good OE replacement suited to normal city driving, stop and go, 1 to 3 times high speed stops with a small cool down period in between each stop or slow down.  I have tried the pads from 160KM/H and it works well.

The pads are also kind on the disc as well.  The rotor looks shiny and is reasonably smooth as well.

Down side of the pad is that I have noticed a very high pitched squeal at very low speeds with very light brake pedal application and only at a certain pressure, any more pressure or any less pressure the sound is not there.  But I did notice that on a very hot day and when the pads are hot the squeal disappears.  But also please note that when installing the pads I just installed them with the standard backing plates but I did not use any brake paste.  So I will try some Wurth Brake Paste when I get some to see if it still squeals.

I noticed that the pads also starts to show signs of decreased performance when driving down a fast down hill section with many turns in a spirited way.  On the 4th brake application I started to feel about a 10-15% drop in efficiency in the initial bite of the pad.  

So in conclusion great OE replacement at a very reasonable price with good general performance which was what the pads were designed for.  Highly recommended as an OE replacement minus away the spirited driving then you will be fine.  If you drive fast and hard for an extended period of time and you require more initial bite, this pad is not for you.  That was not what it was designed for so use the pads for what it was designed for and you will not be disappointed.

Saturday, January 15, 2011

DURAGLOSS PRODUCTS SET TO GO ON TRIAL PART 3 UPDATE 1 WEEK

It has been a week since I applied Duragloss DG 601 PBA and DG 105 TPP.  The car was driven for an average of 900km.  In the 900km it has gone through rain, sunshine, baked in the sun and rain then baked in the  sun finally parked the car and had paint over spray settle on the car making the car feel like sand paper.

DIRT AND BLACK STREAKS 

Earlier in the week after driving back from work which was a 90km highway journey it rain and created black streaks on the car.  After having dinner I decided to give the car a rinse to see if the black stains would stick to the paint.  The procedure that I used, I would not recommend to people as it can possibly damage your paint/clear coat by either scratching it or creating swirls.  I did it just to see how well DG 105 works and the paint is 14 yeras old so and I don't really care about swirls and scratches more over its white and its not easy to see.  Please DO NOT follow the following procedure.  Its just for testing purposes and I don't really care about my paint.  Always use car shampoo as it lifts the dirt away with surfactants and lubricants to prevent scratches and swirls when washing.

What I did after dinner was to use water and a sponge to see if the dirt and the black streaks would come off the car or it did the dirt and black streaks stain the car.  As I was hosing the car down with water and a sponge the dirt was easily removed but most of all the black streaks did not stain the paint and was totally removed just by water.

I was amazed at the DG 105 as other sealant that I tried have would have stained.  After drying the car it was clean and shiny again.

2 days later it rained again and had the usual dirt and black streaks again.  So after dinner I did the same again and the dirt and streaks just came off with water.  Really amazing.

PAINT OVER SPRAY

In between the first and the second rinse if the car with water, the car was subject to paint over spray.  For those who do not know what it is, it basically one of those things you don't want stuck to your car.  So what is it?  Its basically atomized automotive paint flying in the air, landing and sticking to you paint.  How do you know you have paint over spray stuck to your car?  Just run your hands across the paint and it will feel like sand paper.  Really rough.  When I felt that on my car I said to my self OH CRAP!  Cause people who has ever got over spray stuck on to their car will know how difficult it is to remove.

I noticed the over spray on the car when I got back home from work which gave the over spray about  12 hours to stick on the car.  In the 12hrs the car was sitting in the sun accumulating the over spray.

Again, PLEASE DO NOT DO AS I DID as it will scratch and create swirls on the car.  I did it for testing purposes.

I just took a 100% cotton loop cloth and just wiped the car.  I was amazed that all the over spray just came off. Another amazing feat by DG105.

The paint used was blue in color, but there wasn't enough of the over spray to see it but it can definitely be felt on the car.  How do I know the color of the over spray?  Cause there were trucks chassis being sprayed blue in color just near my car.  How near?  About 50+ meters away.

SHORT CONCLUSION

All this protection was possible with only 1 coat of Duragloss DG 601 Paint Bonding Agent and 1 coat of Duragloss DG 105 Total Performance Polish provided that paint was properly prepared before DG 601 and DG 105 is applied.  Really amazing protection for only 1 coat.  This seems to back up statements made in other forums which I have found where they said that you only need 1 coat of DG105 and this was when forumers asked Duragloss in the US.

All in All I would highly recommend Duragloss for people who have white colored cars and are looking for protection along with great looks for their car's paint.

1 WEEK LATER

Its Saturday and it was last Sunday since DG 105 was appiled on the car.  Here I have photos of black streaks on my car after wash and second coat of DG 105.  Why did I decide to have a second coat of DG 105.

First reason was to make have another coat of DG 105 done the correct way, which is not to bake it in the sun before the haze was removed.  Secondly to see how it looks with a second coat.  Many forums which I have researched said that the car looks better with a second coat.

BLACK STAINS ON THE CAR

Here are some black stains taken today.  The stains are a day old with DG 105 being about 1 week old after going through two water and sponge rinse, two different occasions of black streaks and the over spray incident in the week.  So these photos is the third time within the week the paint had black streaks.


 So today is the first time I'm using a car shampoo to wash the car and all the dirt and black streaks just came off.  Below are pictures after a wash with shampoo.


SECOND COAT OF DURAGLOSS DG 105 TOTAL PERFORMANCE POLISH (TPP)

So after the wash with shampoo I applied the 2nd coat of DG 105 (TPP).

I applied DG 601 Paint Bonding Agent (PBA) first before DG 105.  Why?  Because I baked my first coat in the sun without buffing away the haze before I baked and that might have cause the slightly difficult removal of DG 105.

So this time I applied DG 601 (PBA), then allow to haze then applied DG 105 and allowed to dry to a haze before I buffed it with out baking it in the sun.  So was removal easier without baking it in the sun?  Yes it was easier.  In general it was easier to remove DG 105 without baking it in the sun.  But the places where I layered it slightly thick, it was abit difficult to removed but not much.  Therefore it is not advised to bake DG 105 in the sun before removal of the haze and try to apply thin even layers if possible.

STREAKING OF DURAGLOSS DG 105 (TPP)

Here are some photos of DG 105 streaking which I was talking about in previous posts.  This is a very common phenomena I find with many products and not with only DG 105.  But no worries cause its easy to get rid of.  It looks like unremoved haze from the photos but its actually some sort of oil.


So to remove it.  All you have to do is to get a clean good quality micro fiber cloth and buff the whole car.  Here are some pictures after buffing the 2nd coat of DG 105.


The pictures are a little dark today as its going to rain.  I think Duragloss has done a good job to bring out the shine considering the paint is 14 years old.

WHAT'S COMING UP NEXT?


Next week I think I will put on another coat of DG105 using a a rotary buffer with a finishing sponge.  Why?  Just want to find out how DG 105 will react using a machine.  Then after DG 105 I will put a layer of DG 951 (AW) Aquawax on.  Then after it will be Track Claw on test.

Monday, January 10, 2011

DURAGLOSS PRODUCTS SET TO GO ON TRIAL PART 2 UPDATE

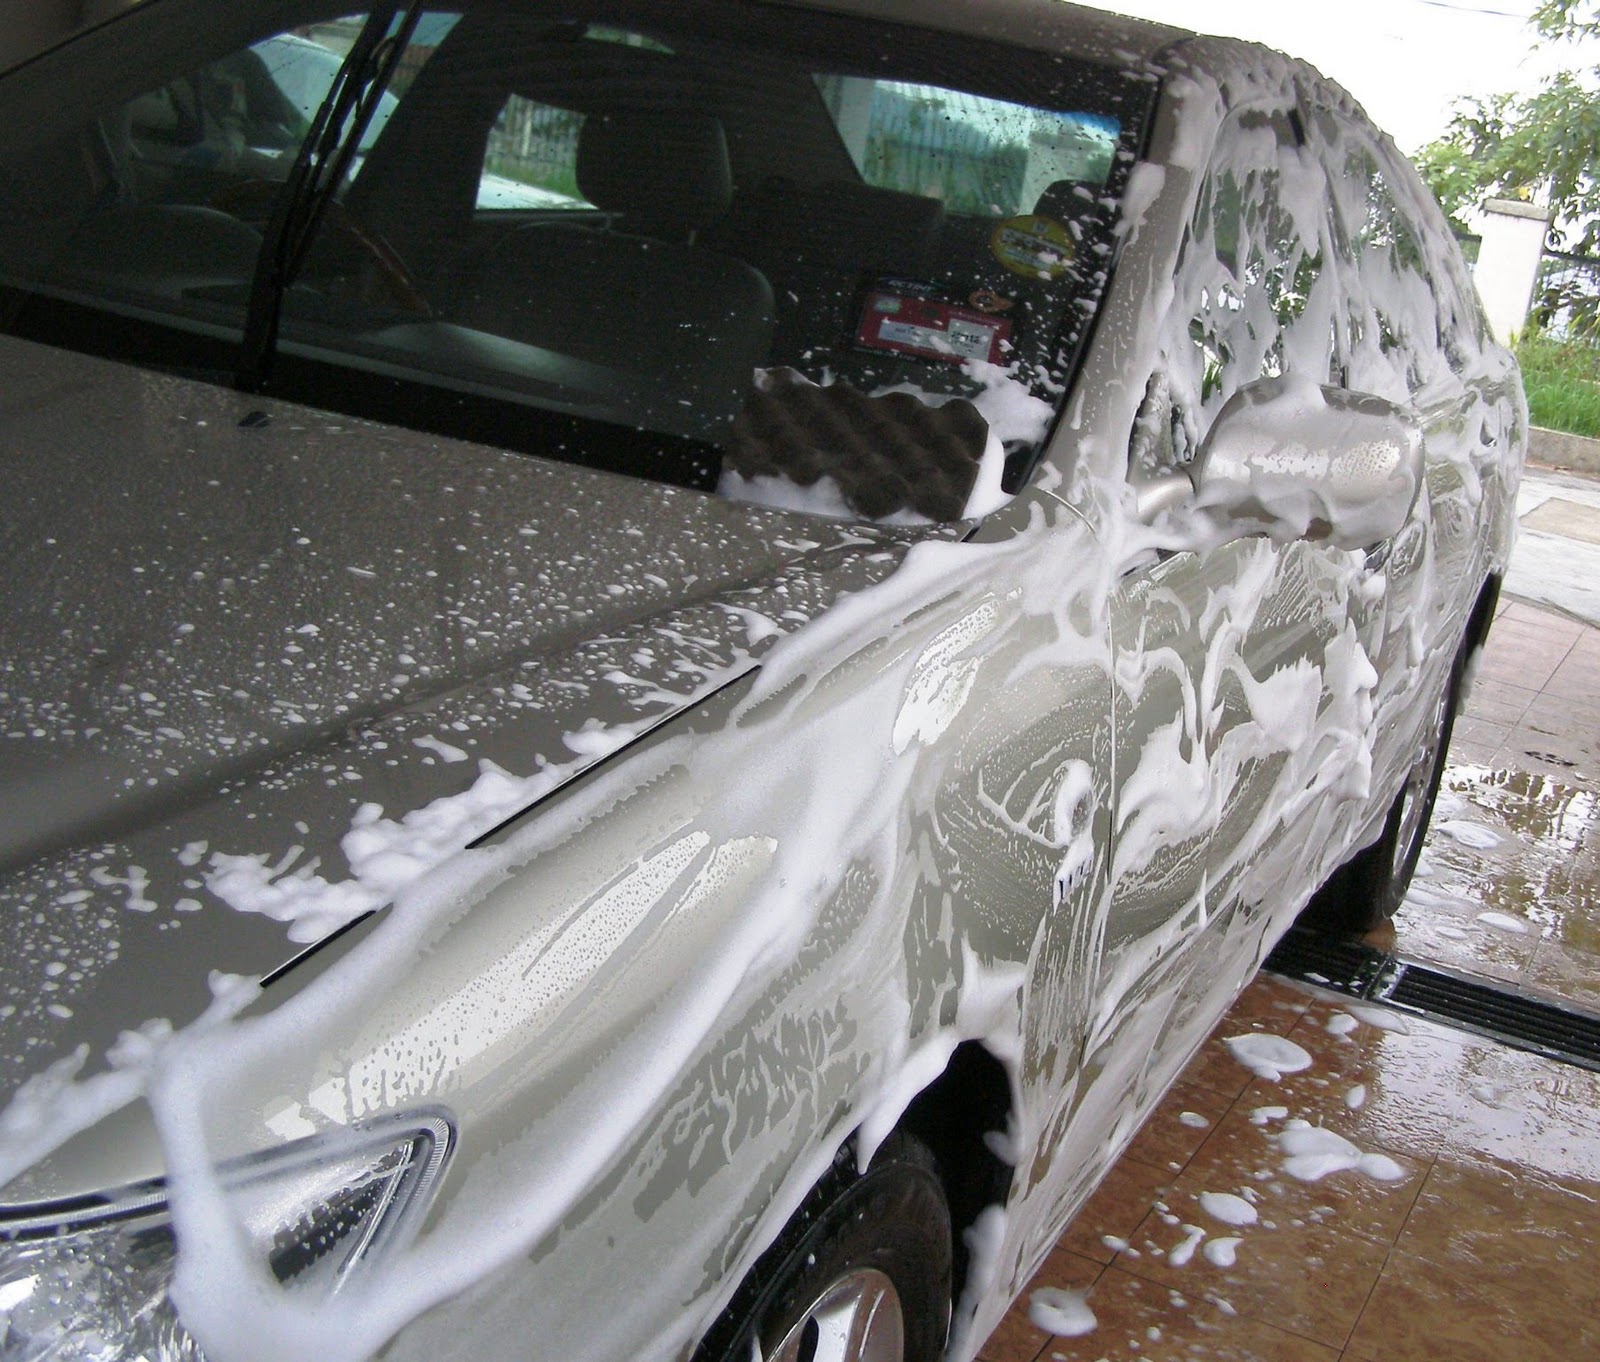
HYDROPHOBIC AND SHEETING ABILITY

It was raining and I can see that DG 105 had good water beading effect along with sheeting ability.  What do I mean?  Well when the car is stationary the water beads up well.  When the car starts to move the water beads will start to move from 55km/h and really clump together at 60km/h.  By 65km/h the water beads would have clumped together enough to form small sheets of water which start to fly off the bonnet of car.

So I did my regular 90km drive home with speeds ranging from 0-150km/h.  Some parts were raining, some places were starting to rain some places was ending with a drizzle.

When I came back home the usual black streaks were on the bonnet.  So after dinner I just used a hose water and a sponge to rinse and sponge the car down.  All the black streaks came off with out a problem without any staining to the paint where other products which I have tried leaves a stain there.  So DG 105 does help to prevent staining if you can clean the stain off early enough.  Which is a big plus point for any of you who have white colored cars.

Now here is where the Duragloss starts to shine and is different from other sealants, coatings and hydrophobic polymers that I have experienced.  Most other products leaves some form of oil behind after buffing.  There are some products which leaves a layer of oil behind and I have noticed on my car that the dirt sticks to the oil and stains the paint even after 1 day in the rain.

With DG 105 when I was buffing with a clean micro fiber it basically didn't leave any oil behind.  But what was left behind was a coating of sealant on top if the paint which is hydrophobic which resist stains and shines.  When the car was parked in the rain today you can see the hydrophobic properties working beading away and when the car moves and the beads of water start to move and clump to form a sheet of water, it starts to sheet away.

Here is another way of explaining what I'm trying to say.  Take for example Rain X windscreen water repellent.  When you apply to the glass you can feel it leaves a thin oily smooth slick feel to the glass.  You can see the film of oil on the glass when it rains and when the wiper wipes through the glass.  Similarly but not necessarily identical "oils" may it be a polymer, silicone, mineral etc which are used in polishes, waxes and sealants when left on the paint may stain the paint as well when road grime is mixed with the oils.  So why are there some form of oils in polishes, waxes and sealants?  Basically for lubrication purposes and visual appearance for the most part of it.

Now here is my theory whether its true or false, wrong or right I don't know.  Its just my theory which I have formed through my observation so far of Duragloss. When I buffed DG 105 off the paint with a clean (freshly washed and dry) cotton cloth, you can see lines/streaks and patches on the paint.  I have found that this is usually caused by oils from the wax, sealant or coatings.  Which I often see on other products which I have tried on my white and maroon civic.  So after using the cotton cloth to buff.  I decided to use the micro fiber and buff what haze which was left behind and oily streaks and patches.  As soon as I used a new/clean micro fiber there was no longer any streaks and patches and all haze removed.  When you feel the paint you can feel the paint is smooth and slick but not the smooth and slick like the Rain X feeling on freshly prepared glass.

So is it a good thing or a bad thing?  Depends on what you are looking for.  The oils will give it warmth and a wet look to the paint.  But the disadvantage is that the oils will get stained and in turn stain the paint more quickly.  But this staining problem is only a real problem with white colored cars.  Any other color you wont be able to see the stain.  Just because you don't see it doesn't mean its not there!  So basically if you have any other car and would like the oils to remain on the paint but the haze removed, I suggest you use a cotton based cloth because a clean and "good" micro fiber cloth will clean off all the haze and oils.  So if you want a wet look use a cotton cloth provided you don't see any streaks or patches on the car.  If you want a clean, hard, shining, sterile look use a good micro fiber.

What I mean by hard, sterile, shine is just like you have sealed the car and the sealant has cured to the paint.  Now the paint is smooth and slick correct?  Now wash the car a few times or even just one time and when you wipe the car down it doesn't have that "oily" film anymore and you are left with just a shining car which has a hard reflective shine.

So DG105 for me I think is good as it helps solve my staining problem, is hydrophobic and sheets water away when the situation allows for it.

Now the million dollar question is how long will it last?  Only time will tell.

CORRECTION ON THE DRYING PROCESS FOR DURAGLOSS DG 105 TPP

I would like to highlight a mistake to all readers in the previous posting which is: "Duragloss Set To Go on Trial  Part 2."  


DG 105 let to haze and baked it in the sun for a while.

Well I got it wrong and it is actually backwards.  You are suppose to apply DG 105 let to haze and dry, buff off all haze then only baked it in the sun if you wish to.

So did it really make any difference to the sealant?  I have no idea.  But that could have been the reason why the haze was a little difficult to buff off?  Well I will never know until I try it the correct way.  So for now I stand corrected in my flawed method and I have to re apply and buff off the proper way and re-gauge again if DG 105 is easier to buff off.

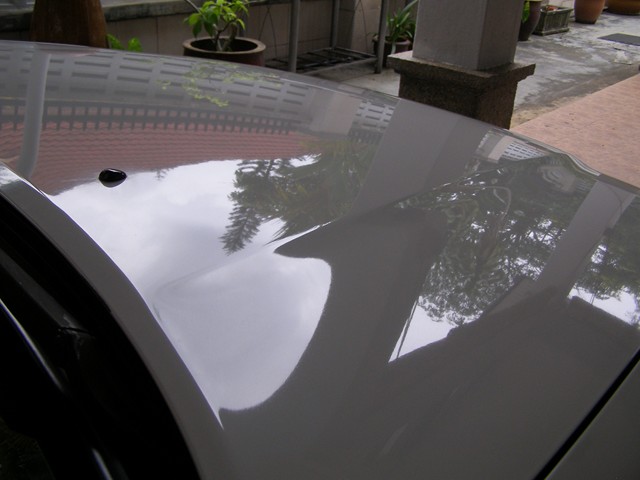
CORRECTION ON "DG 105 CLEAR, HARD AND STERILE"

Here I would like to say that YES DG 105 can be clear, hard, sterile and shining.  YES DG 105 can have a wet look like others have described when using the product.  It depends on how you remove the haze and the cloth used to buff the product.

I also stated in the last post that some people say that DG 105 looks better the next day.  Personally I think it does every so slightly but that is so subjective that I don't even want to go there.  The only real way to test is you measure the difference with a reflectometer which I do not have.  So the only thing I can do is to theorize if it is even remotely possible for DG 105 to look better the next day.

The answer in a nut shell.  YES it is plausible that DG 105 can look better the next day.  Here's why.


http://www.coleparmer.com/techinfo/techinfo.asp?htmlfile=PortableGlossMeasurement.htm&ID=573


"Gloss => direct reflection on the 1st surface. 

In case of high gloss surfaces, light reflected from the surface follows the reflection law (angle of illumination = angle of reflection). The intensity of the reflected light is dependent on the angle of illumination and material properties." 


As can be seen from the illustration, definition and description as as stated in www.coleparmer.com gloss is the direction of reflection from the 1st surface.  So if we assume that our Last Step Product (LSP) is the 1st surface then it would be very plausible that if the LSP has not fully cured it can affect the direction and intensity of the reflected light.

So YES it is definitely possible that DG 105 looks better the next day.  If this theory is correct then this would hold true for any other LSP, coating or sealant which requires longer time for curing so that it gives a more reflective surface.

WHAT'S NEXT?

Over the weekend I will wash the car, make sure the paint is clean, reapply DG 601 PBA and DG 105 and dry to haze in the shade and not bake it first to see if its easier to buff off.  I will not use DG 951 Aquawax until I have a base line of how long DG 105 will last unassisted by any "top ups" by any other products.  Once I have a base line on what DG 105 can do and how long it will last, I can then compare how much DG 105 can last with assistance from DG 951 Aquawax.  We will then move on to DG 2930 Track Claw.

Sunday, January 9, 2011

DURAGLOSS PRODUCTS SET TO GO ON TRIAL PART 2

Hi all,  I just received my products from Duragloss.  Just to recap these are the products I bought.


1. Duragloss DG 601 Paint Bonding Agent (PBA)

2.  Duragloss DG 105  Total Performance Polish (TPP)

3.  Duragloss DG 951  Aquawax (AW)

4.  Duragloss DG 2930 Track Claw (TC)

PREPARATION WORK

I washed the car and after washing I decided to use Osren Crystal Cut 3.0.  Why?  Basically I wanted to remove the of sealant which was Klasse High Gloss Sealant.  At the same time it cleans and polishes the paint.  I didn't want to use any All In One (AIO) products because I wanted a "clean surface" so I can see what Duragloss 601 + 105 will look like and perform.

After polishing the car with Osren Crystal Cut 3.0 I washed the car again, this time with a strong detergent to make sure all polishing oils and what not is no longer on the paint. 

APPLYING AND REMOVING DURAGLOSS

Now with a nice clean surface I started to apply DG 601 PBA.  Its easy to apply.  Just apply a thin even coat let haze.  Then I applied DG 105 TPP.  This was also easy to apply and I did it with thin even layers and let dry to haze.  The weather was good on the day, slightly cloudy with a little bit of sun shine.  Almost perfect weather for detailing. I then rolled the car out into the sun to dry and "bake" for about 15min.  It was't hot blistering sun, the paint was just cool to only body temp warm.  

After about an hour later I started to buff off the DG 105.  Guess what it dried hard and wasn't easy to buff off.  How hard was it to buff off?  If anybody has ever used Klasse High Gloss Sealant and applied a little to thick in some areas and let it dry and tried to buff it off, DG 105 is not as hard to buff off as Klasse HGS but its close.  I did some searching over the internet and have found that some say that its acrylic polymer.  Is it true?  Maybe.  Could it be possible?  Yes.  It sure was very similar to remove like Klasse's acrylic based HGS.  So those who know, please confirm what is DG 105 TPP based on.

I found that after removing DG 105 TPP with a cotton based cloth it is necessary to finish removing all haze using a good clean micro fiber cloth.  What do I mean by clean micro fiber?  Either a new or a freshly washed and cleaned micro fiber with no contaminants.  Then when you start to buff the paint with the micro fiber you can see that the haze being completely removed leaving a clean shining look.  

SUBJECTIVE FEELING AND LOOK OF DG 105 TPP

Well the look of DG 105 is clear, hard and strile.  On my white car with 14year old paint.  It has that hard look like Klasse HGS.  People say it has a "wet look"  but to be fair I can't really say until I try it on a darker coloured car.  But it definitely doesn't have the look of carnauba wax.  For me I'm fine with clear, hard, sterile shining look on my car.  This I guess is a very personal thing.

Feeling of the DG105 is smooth and slick.  But it doesn't have that carnauba feel.  It has a very "polymer sealant" sort of feel for you who knows what that feels like.  Running my fingers across the paint I can feel that there are still some spot which has not completely dried.  You can feel the dried spots are "hard and smooth" and the other undried parts "wet and smooth"  wet meaning that it feels like you have just applied a layer or carnuaba where its smooth, soft and has a wax feel to it.  

So the next day after about 19hrs of drying and curing DG105 feels hard, dry, smooth and slick.  Some people say that it looks better the next day.  Well I might agree with them. I think it might be more psychological than anything else. 


WHAT'S NEXT?

Will test this setup for a while and see how DG 105 stands up to regular everyday abuse and will post updates on this setup.  Then I will move on to DG 105 with Duragloss DG 951 Aquawax (AW) after every wash.  Then I will move on to DG 105 which will be topped off with DG 2930 Track Claw.

Here are some pictures.