Tuesday, January 25, 2011

TRW BRAKE ROTOR AND BENDIX GENERAL CT PAD CHANGE: UPDATE

So far I have done about 5000km and the pads has fully bedded in.  How is it so far?  So far so good.  No more brake judder or vibration coming from the brakes.

Performance of the Bendix General CT for me has been good. Brake dust has been low and was easy to clean.  Braking performance has been good.  But I did notice that the pads just needs a little temperature to really to be at 100%.  Long highway drives tend to cool the pad down a bit and upon application the pad is still good but not as good as when it has a little more heat in them.  

Personally I think this pad is a very good OE replacement suited to normal city driving, stop and go, 1 to 3 times high speed stops with a small cool down period in between each stop or slow down.  I have tried the pads from 160KM/H and it works well.

The pads are also kind on the disc as well.  The rotor looks shiny and is reasonably smooth as well.

Down side of the pad is that I have noticed a very high pitched squeal at very low speeds with very light brake pedal application and only at a certain pressure, any more pressure or any less pressure the sound is not there.  But I did notice that on a very hot day and when the pads are hot the squeal disappears.  But also please note that when installing the pads I just installed them with the standard backing plates but I did not use any brake paste.  So I will try some Wurth Brake Paste when I get some to see if it still squeals.

I noticed that the pads also starts to show signs of decreased performance when driving down a fast down hill section with many turns in a spirited way.  On the 4th brake application I started to feel about a 10-15% drop in efficiency in the initial bite of the pad.  

So in conclusion great OE replacement at a very reasonable price with good general performance which was what the pads were designed for.  Highly recommended as an OE replacement minus away the spirited driving then you will be fine.  If you drive fast and hard for an extended period of time and you require more initial bite, this pad is not for you.  That was not what it was designed for so use the pads for what it was designed for and you will not be disappointed.

Saturday, January 15, 2011

DURAGLOSS PRODUCTS SET TO GO ON TRIAL PART 3 UPDATE 1 WEEK

It has been a week since I applied Duragloss DG 601 PBA and DG 105 TPP.  The car was driven for an average of 900km.  In the 900km it has gone through rain, sunshine, baked in the sun and rain then baked in the  sun finally parked the car and had paint over spray settle on the car making the car feel like sand paper.

DIRT AND BLACK STREAKS 

Earlier in the week after driving back from work which was a 90km highway journey it rain and created black streaks on the car.  After having dinner I decided to give the car a rinse to see if the black stains would stick to the paint.  The procedure that I used, I would not recommend to people as it can possibly damage your paint/clear coat by either scratching it or creating swirls.  I did it just to see how well DG 105 works and the paint is 14 yeras old so and I don't really care about swirls and scratches more over its white and its not easy to see.  Please DO NOT follow the following procedure.  Its just for testing purposes and I don't really care about my paint.  Always use car shampoo as it lifts the dirt away with surfactants and lubricants to prevent scratches and swirls when washing.

What I did after dinner was to use water and a sponge to see if the dirt and the black streaks would come off the car or it did the dirt and black streaks stain the car.  As I was hosing the car down with water and a sponge the dirt was easily removed but most of all the black streaks did not stain the paint and was totally removed just by water.

I was amazed at the DG 105 as other sealant that I tried have would have stained.  After drying the car it was clean and shiny again.

2 days later it rained again and had the usual dirt and black streaks again.  So after dinner I did the same again and the dirt and streaks just came off with water.  Really amazing.

PAINT OVER SPRAY

In between the first and the second rinse if the car with water, the car was subject to paint over spray.  For those who do not know what it is, it basically one of those things you don't want stuck to your car.  So what is it?  Its basically atomized automotive paint flying in the air, landing and sticking to you paint.  How do you know you have paint over spray stuck to your car?  Just run your hands across the paint and it will feel like sand paper.  Really rough.  When I felt that on my car I said to my self OH CRAP!  Cause people who has ever got over spray stuck on to their car will know how difficult it is to remove.

I noticed the over spray on the car when I got back home from work which gave the over spray about  12 hours to stick on the car.  In the 12hrs the car was sitting in the sun accumulating the over spray.

Again, PLEASE DO NOT DO AS I DID as it will scratch and create swirls on the car.  I did it for testing purposes.

I just took a 100% cotton loop cloth and just wiped the car.  I was amazed that all the over spray just came off. Another amazing feat by DG105.

The paint used was blue in color, but there wasn't enough of the over spray to see it but it can definitely be felt on the car.  How do I know the color of the over spray?  Cause there were trucks chassis being sprayed blue in color just near my car.  How near?  About 50+ meters away.

SHORT CONCLUSION

All this protection was possible with only 1 coat of Duragloss DG 601 Paint Bonding Agent and 1 coat of Duragloss DG 105 Total Performance Polish provided that paint was properly prepared before DG 601 and DG 105 is applied.  Really amazing protection for only 1 coat.  This seems to back up statements made in other forums which I have found where they said that you only need 1 coat of DG105 and this was when forumers asked Duragloss in the US.

All in All I would highly recommend Duragloss for people who have white colored cars and are looking for protection along with great looks for their car's paint.

1 WEEK LATER

Its Saturday and it was last Sunday since DG 105 was appiled on the car.  Here I have photos of black streaks on my car after wash and second coat of DG 105.  Why did I decide to have a second coat of DG 105.

First reason was to make have another coat of DG 105 done the correct way, which is not to bake it in the sun before the haze was removed.  Secondly to see how it looks with a second coat.  Many forums which I have researched said that the car looks better with a second coat.

BLACK STAINS ON THE CAR

Here are some black stains taken today.  The stains are a day old with DG 105 being about 1 week old after going through two water and sponge rinse, two different occasions of black streaks and the over spray incident in the week.  So these photos is the third time within the week the paint had black streaks.


 So today is the first time I'm using a car shampoo to wash the car and all the dirt and black streaks just came off.  Below are pictures after a wash with shampoo.


SECOND COAT OF DURAGLOSS DG 105 TOTAL PERFORMANCE POLISH (TPP)

So after the wash with shampoo I applied the 2nd coat of DG 105 (TPP).

I applied DG 601 Paint Bonding Agent (PBA) first before DG 105.  Why?  Because I baked my first coat in the sun without buffing away the haze before I baked and that might have cause the slightly difficult removal of DG 105.

So this time I applied DG 601 (PBA), then allow to haze then applied DG 105 and allowed to dry to a haze before I buffed it with out baking it in the sun.  So was removal easier without baking it in the sun?  Yes it was easier.  In general it was easier to remove DG 105 without baking it in the sun.  But the places where I layered it slightly thick, it was abit difficult to removed but not much.  Therefore it is not advised to bake DG 105 in the sun before removal of the haze and try to apply thin even layers if possible.

STREAKING OF DURAGLOSS DG 105 (TPP)

Here are some photos of DG 105 streaking which I was talking about in previous posts.  This is a very common phenomena I find with many products and not with only DG 105.  But no worries cause its easy to get rid of.  It looks like unremoved haze from the photos but its actually some sort of oil.


So to remove it.  All you have to do is to get a clean good quality micro fiber cloth and buff the whole car.  Here are some pictures after buffing the 2nd coat of DG 105.


The pictures are a little dark today as its going to rain.  I think Duragloss has done a good job to bring out the shine considering the paint is 14 years old.

WHAT'S COMING UP NEXT?


Next week I think I will put on another coat of DG105 using a a rotary buffer with a finishing sponge.  Why?  Just want to find out how DG 105 will react using a machine.  Then after DG 105 I will put a layer of DG 951 (AW) Aquawax on.  Then after it will be Track Claw on test.

Monday, January 10, 2011

DURAGLOSS PRODUCTS SET TO GO ON TRIAL PART 2 UPDATE

HYDROPHOBIC AND SHEETING ABILITY

It was raining and I can see that DG 105 had good water beading effect along with sheeting ability.  What do I mean?  Well when the car is stationary the water beads up well.  When the car starts to move the water beads will start to move from 55km/h and really clump together at 60km/h.  By 65km/h the water beads would have clumped together enough to form small sheets of water which start to fly off the bonnet of car.

So I did my regular 90km drive home with speeds ranging from 0-150km/h.  Some parts were raining, some places were starting to rain some places was ending with a drizzle.

When I came back home the usual black streaks were on the bonnet.  So after dinner I just used a hose water and a sponge to rinse and sponge the car down.  All the black streaks came off with out a problem without any staining to the paint where other products which I have tried leaves a stain there.  So DG 105 does help to prevent staining if you can clean the stain off early enough.  Which is a big plus point for any of you who have white colored cars.

Now here is where the Duragloss starts to shine and is different from other sealants, coatings and hydrophobic polymers that I have experienced.  Most other products leaves some form of oil behind after buffing.  There are some products which leaves a layer of oil behind and I have noticed on my car that the dirt sticks to the oil and stains the paint even after 1 day in the rain.

With DG 105 when I was buffing with a clean micro fiber it basically didn't leave any oil behind.  But what was left behind was a coating of sealant on top if the paint which is hydrophobic which resist stains and shines.  When the car was parked in the rain today you can see the hydrophobic properties working beading away and when the car moves and the beads of water start to move and clump to form a sheet of water, it starts to sheet away.

Here is another way of explaining what I'm trying to say.  Take for example Rain X windscreen water repellent.  When you apply to the glass you can feel it leaves a thin oily smooth slick feel to the glass.  You can see the film of oil on the glass when it rains and when the wiper wipes through the glass.  Similarly but not necessarily identical "oils" may it be a polymer, silicone, mineral etc which are used in polishes, waxes and sealants when left on the paint may stain the paint as well when road grime is mixed with the oils.  So why are there some form of oils in polishes, waxes and sealants?  Basically for lubrication purposes and visual appearance for the most part of it.

Now here is my theory whether its true or false, wrong or right I don't know.  Its just my theory which I have formed through my observation so far of Duragloss. When I buffed DG 105 off the paint with a clean (freshly washed and dry) cotton cloth, you can see lines/streaks and patches on the paint.  I have found that this is usually caused by oils from the wax, sealant or coatings.  Which I often see on other products which I have tried on my white and maroon civic.  So after using the cotton cloth to buff.  I decided to use the micro fiber and buff what haze which was left behind and oily streaks and patches.  As soon as I used a new/clean micro fiber there was no longer any streaks and patches and all haze removed.  When you feel the paint you can feel the paint is smooth and slick but not the smooth and slick like the Rain X feeling on freshly prepared glass.

So is it a good thing or a bad thing?  Depends on what you are looking for.  The oils will give it warmth and a wet look to the paint.  But the disadvantage is that the oils will get stained and in turn stain the paint more quickly.  But this staining problem is only a real problem with white colored cars.  Any other color you wont be able to see the stain.  Just because you don't see it doesn't mean its not there!  So basically if you have any other car and would like the oils to remain on the paint but the haze removed, I suggest you use a cotton based cloth because a clean and "good" micro fiber cloth will clean off all the haze and oils.  So if you want a wet look use a cotton cloth provided you don't see any streaks or patches on the car.  If you want a clean, hard, shining, sterile look use a good micro fiber.

What I mean by hard, sterile, shine is just like you have sealed the car and the sealant has cured to the paint.  Now the paint is smooth and slick correct?  Now wash the car a few times or even just one time and when you wipe the car down it doesn't have that "oily" film anymore and you are left with just a shining car which has a hard reflective shine.

So DG105 for me I think is good as it helps solve my staining problem, is hydrophobic and sheets water away when the situation allows for it.

Now the million dollar question is how long will it last?  Only time will tell.

CORRECTION ON THE DRYING PROCESS FOR DURAGLOSS DG 105 TPP

I would like to highlight a mistake to all readers in the previous posting which is: "Duragloss Set To Go on Trial  Part 2."  


DG 105 let to haze and baked it in the sun for a while.

Well I got it wrong and it is actually backwards.  You are suppose to apply DG 105 let to haze and dry, buff off all haze then only baked it in the sun if you wish to.

So did it really make any difference to the sealant?  I have no idea.  But that could have been the reason why the haze was a little difficult to buff off?  Well I will never know until I try it the correct way.  So for now I stand corrected in my flawed method and I have to re apply and buff off the proper way and re-gauge again if DG 105 is easier to buff off.

CORRECTION ON "DG 105 CLEAR, HARD AND STERILE"

Here I would like to say that YES DG 105 can be clear, hard, sterile and shining.  YES DG 105 can have a wet look like others have described when using the product.  It depends on how you remove the haze and the cloth used to buff the product.

I also stated in the last post that some people say that DG 105 looks better the next day.  Personally I think it does every so slightly but that is so subjective that I don't even want to go there.  The only real way to test is you measure the difference with a reflectometer which I do not have.  So the only thing I can do is to theorize if it is even remotely possible for DG 105 to look better the next day.

The answer in a nut shell.  YES it is plausible that DG 105 can look better the next day.  Here's why.


http://www.coleparmer.com/techinfo/techinfo.asp?htmlfile=PortableGlossMeasurement.htm&ID=573


"Gloss => direct reflection on the 1st surface. 

In case of high gloss surfaces, light reflected from the surface follows the reflection law (angle of illumination = angle of reflection). The intensity of the reflected light is dependent on the angle of illumination and material properties." 


As can be seen from the illustration, definition and description as as stated in www.coleparmer.com gloss is the direction of reflection from the 1st surface.  So if we assume that our Last Step Product (LSP) is the 1st surface then it would be very plausible that if the LSP has not fully cured it can affect the direction and intensity of the reflected light.

So YES it is definitely possible that DG 105 looks better the next day.  If this theory is correct then this would hold true for any other LSP, coating or sealant which requires longer time for curing so that it gives a more reflective surface.

WHAT'S NEXT?

Over the weekend I will wash the car, make sure the paint is clean, reapply DG 601 PBA and DG 105 and dry to haze in the shade and not bake it first to see if its easier to buff off.  I will not use DG 951 Aquawax until I have a base line of how long DG 105 will last unassisted by any "top ups" by any other products.  Once I have a base line on what DG 105 can do and how long it will last, I can then compare how much DG 105 can last with assistance from DG 951 Aquawax.  We will then move on to DG 2930 Track Claw.

Sunday, January 9, 2011

DURAGLOSS PRODUCTS SET TO GO ON TRIAL PART 2

Hi all,  I just received my products from Duragloss.  Just to recap these are the products I bought.


1. Duragloss DG 601 Paint Bonding Agent (PBA)

2.  Duragloss DG 105  Total Performance Polish (TPP)

3.  Duragloss DG 951  Aquawax (AW)

4.  Duragloss DG 2930 Track Claw (TC)

PREPARATION WORK

I washed the car and after washing I decided to use Osren Crystal Cut 3.0.  Why?  Basically I wanted to remove the of sealant which was Klasse High Gloss Sealant.  At the same time it cleans and polishes the paint.  I didn't want to use any All In One (AIO) products because I wanted a "clean surface" so I can see what Duragloss 601 + 105 will look like and perform.

After polishing the car with Osren Crystal Cut 3.0 I washed the car again, this time with a strong detergent to make sure all polishing oils and what not is no longer on the paint. 

APPLYING AND REMOVING DURAGLOSS

Now with a nice clean surface I started to apply DG 601 PBA.  Its easy to apply.  Just apply a thin even coat let haze.  Then I applied DG 105 TPP.  This was also easy to apply and I did it with thin even layers and let dry to haze.  The weather was good on the day, slightly cloudy with a little bit of sun shine.  Almost perfect weather for detailing. I then rolled the car out into the sun to dry and "bake" for about 15min.  It was't hot blistering sun, the paint was just cool to only body temp warm.  

After about an hour later I started to buff off the DG 105.  Guess what it dried hard and wasn't easy to buff off.  How hard was it to buff off?  If anybody has ever used Klasse High Gloss Sealant and applied a little to thick in some areas and let it dry and tried to buff it off, DG 105 is not as hard to buff off as Klasse HGS but its close.  I did some searching over the internet and have found that some say that its acrylic polymer.  Is it true?  Maybe.  Could it be possible?  Yes.  It sure was very similar to remove like Klasse's acrylic based HGS.  So those who know, please confirm what is DG 105 TPP based on.

I found that after removing DG 105 TPP with a cotton based cloth it is necessary to finish removing all haze using a good clean micro fiber cloth.  What do I mean by clean micro fiber?  Either a new or a freshly washed and cleaned micro fiber with no contaminants.  Then when you start to buff the paint with the micro fiber you can see that the haze being completely removed leaving a clean shining look.  

SUBJECTIVE FEELING AND LOOK OF DG 105 TPP

Well the look of DG 105 is clear, hard and strile.  On my white car with 14year old paint.  It has that hard look like Klasse HGS.  People say it has a "wet look"  but to be fair I can't really say until I try it on a darker coloured car.  But it definitely doesn't have the look of carnauba wax.  For me I'm fine with clear, hard, sterile shining look on my car.  This I guess is a very personal thing.

Feeling of the DG105 is smooth and slick.  But it doesn't have that carnauba feel.  It has a very "polymer sealant" sort of feel for you who knows what that feels like.  Running my fingers across the paint I can feel that there are still some spot which has not completely dried.  You can feel the dried spots are "hard and smooth" and the other undried parts "wet and smooth"  wet meaning that it feels like you have just applied a layer or carnuaba where its smooth, soft and has a wax feel to it.  

So the next day after about 19hrs of drying and curing DG105 feels hard, dry, smooth and slick.  Some people say that it looks better the next day.  Well I might agree with them. I think it might be more psychological than anything else. 


WHAT'S NEXT?

Will test this setup for a while and see how DG 105 stands up to regular everyday abuse and will post updates on this setup.  Then I will move on to DG 105 with Duragloss DG 951 Aquawax (AW) after every wash.  Then I will move on to DG 105 which will be topped off with DG 2930 Track Claw.

Here are some pictures.


Tuesday, January 4, 2011

TRW BRAKE ROTOR AND BENDIX GENERAL CT PAD CHANGE

So whats new in terms of new fixes?  I have had my Nissan Cefiro/Maxima A32 3.0liter for almost 14 years.  For a very long time I have suffered extreme Disc Variation Thickness (DVT) or more commonly know but not accurate Warped brake rotors.

PROBLEM ENCOUNTERED

When ever I braked at high speed the steering would vibrate and the brake pedal pulsate.  It just gets worse and worse.  Turning/machining or skimming the rotors would only solve the problem for awhile (10,000km) and the problem would come back.  So after living with this problem for the life of the vehicle and trying to understand what causes DVT I hope I have solved the problem once and for all.  Read on to find out what I did.

DISC VARIATION THICKNESS (DVT)

Common know as warped rotors more because it feels like the rotors are warped rotor rather than it being the truth.  DVT is basically the rotor wearing away unevenly. Some parts of the disc has worn away more than other parts causing high and low spots on the rotor.

My case was so severe that even at 10km/h-20km/h with constant brake pressure you can feel when the brake pad bites when it moves across the high section and release when the hits the low section of the rotor.  Clear sign that cementite has started to form and the rotors are in a down spiral of self degradation.

A good article can be found here:  http://www.stoptech.com/tech_info/wp_warped_brakedisk.shtml

SOLVING THE PROBLEM

So I needed to get rid of as much heat as possible.  The standard rims didn't really help in that area as its not you regular 5 spoke with huge holes type rims.  I want to keep the standard rim so the only choice left is to remove the inside rotor dust shield to improve air circulation to the rotor.

Next was to get a new set of brake pads.  I have used Original Akebono Nissan brake pads and EBC Kevler brake pads.  They are really expensive where I live.  RM600.00 for Akebono Nissan and EBC Kevlar was about RM450.  So I started to search a pad which was kind on rotors and still had good performance.  So I decided to try out Bendix General CT.  I took a look at the Bendix Metal King and the metal fibers that were on the pad looks really scary and have heard that its not really kind to rotors.  So Bendix General CT was the way forward.  Price for 1 set was only RM95.  Far cry from the arm and a leg that I use to pay of the Akebono and EBC.

So next was new rotors.  I went to the spare parts shop and asked if that had rotor for my A32 3.0L.  They said yes and its by TRW and its RM145/pc so 2 pcs was RM290.  The guy had to order them but that only took a few hours.  So when the rotors arrived and I opened it up to check to my surprise this looks very different from my rotors.  So I said do you have the 2.0L version he said yes and I asked him if I could compare the two.  So he brought them out and to my surprise the 2.0L rotors looks similar to the set on my car.  Crap all this while I've been having the wrong set on rotors on my car.

From the factory I started having the problem so I changed to a set of slotted rotors and the 2nd set of slotted rotors were based on what I had originally on my car.  I said DAMN here is your problem.

The difference between the 3.0L and 2.0L rotors is that the 3.0L rotors are much thicker and has more "metal" to dissipate more heat caused by the heavier and high powered engine.  I measured the new 3.0L discs and they are 26.2mm thick (min. thickness 24mm) vs. 21.2mm on my current slotted rotors (min thickness 20mm).  I would guess a new set of the slotted rotors would have been only 22mm-23mm which is still far from 26.2mm!

INSTALLATION OF NEW BRAKE ROTORS AND PADS

So I removed the inside dust shield, cleaned the new rotors of their protective coating and installed the new pads and changed the brake fluid.

TEST DRIVE

First experience of the Bendix General CT brake pads are that the titanium strip really works as advertised.  "The pads works straight out of the box."  They did really work straight out of the box.  The initial bite is good and was surprised by the performance.  So I drove the car about 50km on the highway at night to bed the pads in.  Did it with increasing speeds and cooling/cruising between each application and did it at night as there were less cars and the air is much cooler then.

AFTER 2000KM

My experience with the Bendix General CT is that its good value for money and the performance is good enough for most applications except for hard street driving and track use.  It was never designed for those purposes anyway.

I did notice that the initial bite had dropped off a little and I suspect that the initial titanium strip on the pads has been worn off and it was the strip that gives the good straight out of the box feel. But the pad in general still has good initial bite (but not as much as EBC greens for example).  The pads are really progressive smooth and quiet. The only noise you will get is when you ar in "D" and the car has stopped and to just release enough pressure for it to crawl/creep forward, the pad will groan.  All the pads I have used does that and thats no big deal.  You can "drive" around that problem.

All in all I'm very pleased with the performance of the Bendix General CT and the value it present.

I did notice on a few occasions while driving on the highway, the toll gate was coming up and where the temps were cool (ambient temps about 26-28 celcius) after it had rained.  The pads lost some of its initial bite.  It felt like an OEM organic pads; smooth and no inital bite and like the pads were cold.  But once you get the heat back into then its ok and the bite comes back.  This is also not a big deal as its not like there "weren't"  any brakes like some full metal pads used for track use where you can have a heart stopping moment of no brakes cause the pads are cold.

As for my DVT problem.  Well currently solve and everything is good.  The real test is when it reaches the 10,000km mark where the old DVT problem would start to surface.


DURAGLOSS PRODUCTS SET TO GO ON TRIAL PART 1

Hi, I'm back again.  So what's new?  I'll be trying out Duragloss's range of products.  Why?  Nothing to do, too free, hand itchy.  Just love to play with something new maybe?  Duragloss will go on trial as soon as I get my hands on them.

PARAMETERS:

It will be used on my Nissan A32 Cefiro/Maxima (in other parts of the world).  Its solid white with original factory paint and the car is going on 14years this year.  Mileage of the car is about 243,000km.  The paint is getting thin in areas but its my daily driven car and has served me well.  This is also my Guinea pig car for me to test all sorts of car detailing products.

I may have mentioned this earlier in my other postings, but I'll say it again.  I'm not loyal to any product and I will try almost any product.  From all my experience and from the evidence that my car still has its original paint for 14 years will sort of confirm that any product will work to protect your paint.  So long as you are willing to maintain the layer of protection you have put on your car.

So may it be a polymer sealant, wax, acrylic, Titanium dioxide, quartz, nano based, water based, solvent based, whatever you name it.  Most of them work to protect the paint.  Its just a matter of maintenance of the protective layer and whether the protective layer gets stained and dirty or etched through.

So why try Duragloss.  No particular reason.  Just curious to see how it works and how it stacks up to the other products I have tried.  I'm also running out of my old sealant so why not try something else which is new to me.

Duragloss products that will be applied to the car and the car will go through about 1000KM a week come rain or shine.  It will be mostly highway driving.  9am-6.30pm the car will be parked in an open area where the car will experience 100% rain and 100% sunshine or what ever weather it will be on that particular day.

The car will only be washed maximum once a week or even once in 2 weeks depending on how busy I am.

So I think we will give very harsh conditions for Duragloss.

PRODUCTS ON TRIAL

1. Duragloss DG 601 Paint Bonding Agent (PBA)

2.  Duragloss DG 105  Total Performance Polish (TPP)

3.  Duragloss DG 951  Aquawax (AW)

4.  Duragloss DG 2930 Track Claw (TC)

PROPOSED PREP WORK BEFORE APPLICATION

I only have very little time so I will do the following:

1. Wash car

2.  Paint clean (Polish/Clay)

3.  Rinse Car

4.  Apply Duragloss products.

CURRENT SEALANT ON THE CAR

Currently the car has Klasse High Gloss Sealant.  Applied on 1/01/2011 and applied 2nd coat on 2/01/2011.  Car has not been washed since its application of the coating.

Saturday, March 20, 2010

Nothing Like Having A Decent Broadband Connection

Just got my unlimited broadband connected with advertised download speeds of 2Mbps and upload speed of 500Kbps.  Service provider is TM (Telkom Malaysia) Streamyx with the unlimited 2Mbps Blockbuster Package. Where the package includes a free DECT Cordless Phone and Wifi Modem.  For the latest Block buster promotions click here


From the day I applied for the connection it took 4 working days before a TM technician came to the house to setup the Wifi modem and to activate the line.  It took another 24hrs for the connection to be upgraded to 2Mbps from my original 512Kbps.  Best thing about it was that the upgrade didn't disrupt my 512K connection which is very important.  The login name and password were the same as the 512K connection.  So the transition you could say was seamless. So in total it took 5 working days to get my 2Mbps connection.

PERFORMANCE

Performance of the new connection has been quite good where I get 90% of the advertised speed.  So with 2Mbps connection its enough for most everyday needs like web surfing, streaming videos and downloads.

Speed test done with a local server and the second test was done with a server in the US.


With this connection I am able to stream youtube for 2-3 computers but some tweaking is need on the computers before you are able to do that if you are from Malaysia.  Email me if you want to know how I did it.

Sopcast, TVU Player and TV ants streams reasonably well, but out of the 3 mentioned I think TVU player was the most stable.  For those who doesn't know what the 3 programs are they are just programs which you install on your computer and you are able to watch FREE streaming tv online.  You can download the programs for free here:   http://tvuplayer.en.softonic.com/ Sopcat and TV ants link is on the same page but 3/4 down the page.  Just scroll down 3/4 of the page and you will see "Programs similar to TVU Player" just click the dowmload Sopcast and TV ants.

Internet radio also streams well with only 1-2 sec breaks every 2hrs or so.  The site I stream is from the US.

So the last few things I did for tweaking was to optimize my router modem to the proper MTU.  I used Command Prompt (Start>Run>CMD) and  "ping google.com -f -l 1467" where 1467 was the MTU number and I tried number up and number down until I got the fastest response with no fragmentation.

Then I went to http://www.dslreports.com/tweaks and used the online tweak tool. I also downloaded Dr.TCP to do the adjustments. http://www.dslreports.com/drtcp Dr.TCP only work for Windows XP or older and not for Vista and Win 7 as Vista and Win 7 uses a dynamic TCP stack which auto tunes by its self. You can Google "vista tcp tuning modes" and read more about it and do your own tests.

All in all I find that I'm satisfied with my connection and its good enough for most circumstances except when you are downloading large files like movies.  In any case it beats having a 512Kbps connection.  The "always on unlimited connection is really nice to have when you are trading the stock market online.  Something one should get if they are considering trading stocks online.

So how are the free products performing?

The DECT cordless phone is working well and currently no problem with it except I don't really like the fonts and the type of screen used.

The Innocomm Wifi modem?  Haven't really used it.  Its currently shelfed for emergency use only when my TP-Link wifi router or Aztec modem dies on me.  Why am I not using it?  Well basically all my computers are using wifi to get connected and the Innocomm Wifi moden doesn't allow me to "dial my connection" using wifi.  It only allows you to dial a connection or disconnect it when you are hooked up to the Wifi modem using LAN cable.  That is a real pain.  The GUI page for all setting and functions for the modem also isn't really good and user friendly.  That's why its only a backup.

Friday, December 18, 2009

Auto Detailing: Mirror Finish


My wife calls it OCD (Obsessive Compulsive Disorder) and gives me no end as to why I don't treat her like I do the car.  I replied "the car is for you to drive with pride and you can take care of yourself but the car can't take care of itself and OCD is Obsessive Car Detailing!"

CAUTION DO NOT TRY THIS UNLESS YOU HAVE EXPERIENCE.

Wet sanding and using a rotary buffer needs skill and experience in order not to damage you paint.

You may have seen many pictures of cars after being detailed on the web with jaw dropping looks. There are also many people claiming to have developed products that give you a mirror finish on your paint. The reality is that the finish that you have is basically as good as your paint condition. The color will also affect the quality of the image reflected. The darker the color the more reflective or mirror like image you will have. Black will the the choice of color for the best effect.


So what's stopping us from having a mirror finish on our cars? Well its something known as "orange peel" effect. The waviness of the surface does not allow for a mirror like finish. Most of the cars that roll out from the factory has some degree of orange peel. Even the most expensive cars that roll out from the factory has some degree of orange peel. So how do you get an orange peel free car? Well its almost impossible to get a 100% orange peel free but you will get pretty close. But you can get very close to it if you are willing to spend the money and your painter has the skill to do it. Basically to get a perfect finish you need to sand each layer of paint flat and every layer of clear coat flat. Then you would have to sand your final layer of clear coat flat as well.


How did I get the mirror finish on my 1997 Honda Civic? Well the car was repainted fully and was fixed (rear, accident) for RM1800 or ~USD500. Yes that's a super cheap paint job including the cost of fixing the accident. Well you wouldn't expect a flawless finish with that kind of price would you. That was all that I had budget for. Anyway no use in having such a perfect paint job as the car will be daily driven and will be parked everywhere, going to school, shopping malls etc.

Once I got the car back from the painter these are the steps that I took to get a mirror finish. There are other smaller steps involved like masking the car, how to actually wet sand which I will not go into detail as it is too long.

1. I used a 2000 grit sand paper and started sanding away at the paint. For those who don't know. Yes you are sanding the paint! It will look like the paint has been destroyed. Just take an old unwanted cd and just sand it with 2000 grit sand papepr until it becomes blur. Yes that is how your car will look. I did it in the house and when my wife and kids saw the car they said you have spoiled a newly painted car! An example of a video can be found below.


2. Once you have finished wet sanding the car. The next step is to use a rotary polisher/buffer. Why a rotary? Because doing it by hand, orbital buffer or dual action buffer/polisher will not work as it is not aggressive enough to remove and polish the sanded clear coat.

What I used was a rotary buffer with a wool pad and the choice of compound was Osren Crystal Cut 3.0. You can use any brand you like as long as it works for the type of clear coat that you have as some clear coats are harder than others. Obviously different brands and type of compounds will work differently with different foam pads and wool pad combinations. So that is your choice and what works well with your clear coat. I used a wool pad and Osren Crystal Cut 3.0 as it cuts fast to bring the shine back with minimal swirl and compounding scratches.

3. Polishing, removing swirls and compounding scratches. In this step I used the rotary buffer with a black fine finishing foam pad and Osren Crystal Cut 3.0 as the choice of polish. Yes for those who are experienced, my cutting/compounding agent is the same as my polishing agent. The only difference is the pad. That's why I chose to use Osren Crystal Cut 3.0 as it is a really good product which does compound cutting and polishing. But the trick is that you have to be good at using the rotary buffer in order not to add any scratches and swirls, your choice of foam pad has to be fine and soft. Once you have finished the step you would have noticed by now you would have a mirror like finish!

So what gives you the mirror like finish? Yes you got it, wet sanding, cutting/compounding and polishing. Its NOT the PRODUCT! Its the skill and the proper techniques in wet sanding and using a rotary buffer/polisher properly that will give you the mirror finish. The choice of products and pad combination is really up to you and are limitless. So no product that I have seen can give you a mirror like finish. It can help you get it but it will never be close to a mirror like image because the orange peel is still there and what you need is a smooth surface and not an orange peel surface. Can you image the mirror in your house is wavy and has an orange peel effect? Will any product make it look like a regular mirror? Well I doubt it.

4. You finally have your mirror finish and you are amazed by it. Now you have a mirror finish which is unprotected. So this step is all about your LSP product or Last Step Product. Here again it really comes down to personal preference. You may like to take the natural route of using carnauba. Or you would like to take the synthetic route. It really is up to you.

Here is my opinion. If you think about it for a second you have a mirror finish. You would want to protect that finish as much as you can from evil and deadly bird droppings, tar spots, unidentified stains which appear from god knows where acid rain etc. So logically synthetic wold be the wiser choice and the synthetics outlast and protects better than the natural carnauba. Unless your car is going to be a show car or a weekend car or a "perfect weather" car than carnauba will do just fine. But mine its going everywhere and everyday so carnauba ain't going to cut it. I did try carnauba and other synthetics on my car but it didn't make the reflection any better, just the color was deeper. That also tells me that what I'm looking for in a product now was durability and not a "mirror effect" as the stuff I tried didn't make it any better than it already was. Just to name a few, I did try Meguiars Klasse, Turtle Wax, Eagle 1. I tried from carnauba to polymers, to resins to acrylics. All more or less faired the same in terms of making the surface more reflective. Ask yourself this question. Can you really make your mirror shine more? So my goal was to look for durability and looks came second.

My choice of sealant is a new player in the sealant game Pompanazzi 880-X. Quartz crystal SiO2 with a hardness of 9H. This product is NOT for everyone as it takes a hell of a long time to fully cure! 7 to 10 days! Best if the coating does not come into contact with water for the first 3 days. Trying doing that in an Asian country during the raining monsoon season!
Well what I did was to buy 20mls. 20mls is plenty. Believe me! So what I did was to first apply 10mls. This is a 2 part mixture product. 1st is the active ingredient 2nd is the hardener. After mixing up my first batch of 10 mls. I started to apply in very thin coats. How thin? One dap from the bottle on a very fine micro fiber cloth is enough to coat 1/4 of the bonnet of the Civic! Now you know why 20mls is plenty. With 10mls I could coat the car 3 times over.

I applied the first coat then let to dry then buff to a shine. Then wait for a while then the 2nd coat then the 3rd. You cannot allow it to dry completely, if it does, the part which is took thick you will not be able to remove it unless you compound it off! That is how hard this stuff is. For the users who have used Klasse High Gloss Sealant. If you think removing that was difficult you don't want to let the quartz stuff fully dry before you buff. Yes! You would have to compound or polish it off! Then you would have to start all over again. So after 10mls I let cure for 10 days. Then same goes for the 2nd and final 10mls. You can watch this video of applying it here:


After letting the full 20ml or about 6 coats fully cure. The feeling of the the product is just unbelievable. Regular 2K or 2 coat paint systems usually have this plastic acrylic feel to it. But once this Pompanazzi 880-X quartz stuff fully cures it does really feel hard and smooth, more like real glass. Well the shine? This is the only product currently I have tried which has brought the shine one step further. The reflection looks much sharper, more crisp and the colors of the reflection looks much more richer. Brings the mirror finish closer to a true mirror finish. Not to mention the surface feels much more like glass and is hydrophobic as well.

In my opinion an excellent product and best product I have used so far, provided you can bear with the curing times and the application procedure.

5. Finish off with a Quick Detailer of my own formulation for everyday maintenance of the mirror finish after washing the car. The Pompanazzi 880-X quartz coating is suppose to last 2-3 years and life time with maintenance. Well I want my mirror image to last a life time so I decided to add a weekly or biweekly sacrificial layer on top of the Pompanazzi 880-X. Moreover my formulation is also hydrophobic and it adds slickness to the Pompanazzi 880-X (which it doesn't really have) which will help reduce scratches to my mirror finish even though the coating is claimed to be 9H hardness it still can be scratched easily in the "real world" with everyday driving. Below is the video of my car and its hydrophobic / water beading or water sheeting effect.


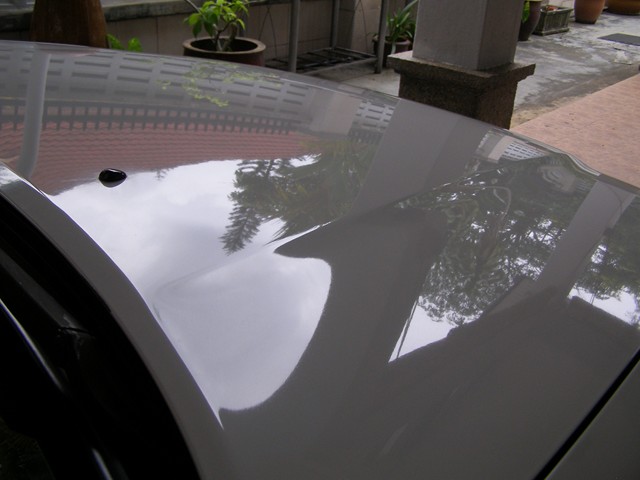
Here are some pictures of my car. The products used in the pictures are only used to illustrate the mirror finish effect and I am in no way directly or indirectly promoting or endorsing any of the products being displayed.


Image below are from the roof.


\


Image from the bonnet.


Image from the boot lid.